I recently set up a ZFS mirror on my home server and found myself needing a way to be alerted if something went wrong. That same server runs Grafana and InfluxDB, and collects various metrics from my other machines (and itself) via Telegraf. Since I already have email alerts set up with that stack, it felt simplest to use it for this solution.
A really simple script
#!/bin/sh

# Compares the expected zpool status output with the actual status.
# Copy to a global location such as /usr/local/bin so it's accessible to Telegraf.
# Note: This can provide a false-postive if the output of the command changes, which is not guaranteed to be stable.

# Returns 0 for "false" (not healthy), returns 1 for "true" (healthy)
# Chose using integers over booleans due to how Grafana handles alerts.

OUTPUT="zfs_status,host=[HOSTNAME HERE] healthy="

if [ "$(zpool status -x)" != "all pools are healthy" ]; then
	OUTPUT=${OUTPUT}"0i"
else
	OUTPUT=${OUTPUT}"1i"
fi

echo $OUTPUT
There are similar scripts floating around on the Internet so I used those for inspiration. The only difference with mine is that it outputs the InfluxDB Line Protocol.
host= is just a convenient tag where you could put your box’s hostname (or call the hostname command and interpolate it).
Everything else should be explained by the script, including the possibility of false positives. Feel free to rename the zfs_status field to anything you wish. In my instance I use tws_zfs_status to differentiate custom fields I’ve created and possibly prevent namespace conflicts.
The Telegraf side
Telegraf has a super handy exec input where you can run arbitrary commands, so that’s what we use:
[[inputs.exec]]
  commands = ["sh /usr/local/bin/zfs_check.sh"]
  timeout = "5s"
  data_format = "influx"
When Telegraf collects data from its inputs it will write a one or a zero for its zfs_status field.
And finally, Grafana
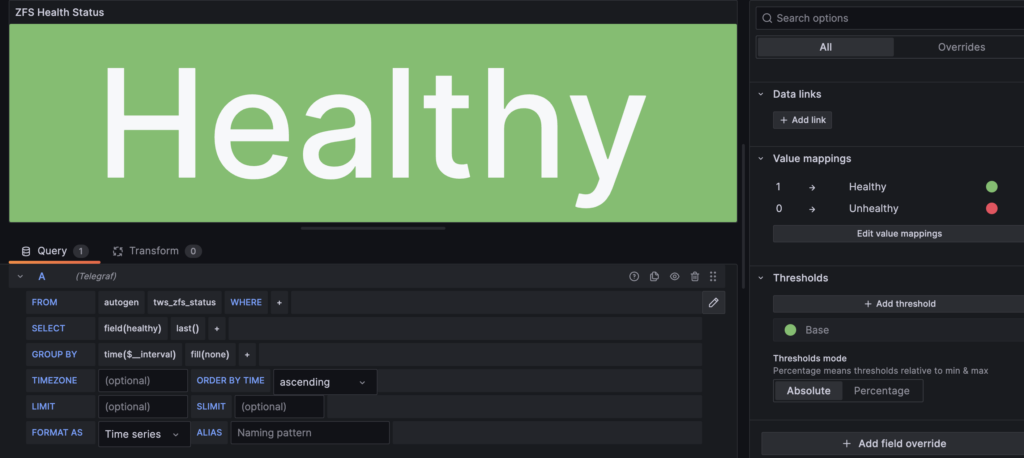
The basic setup in Grafana is:
- Stat type
- Grab the last value
- Map 1 to “Healthy” / green, 0 to “Unhealthy” / red
- Set up an alert for when the value is less than 1
That’s basically it! It’s a really good idea to test it by temporarily tweaking the script to output a 0 and waiting for an email to arrive. 🙂